
Wake On LAN Remotely
Created: Jul 05, 2025
Last modified: Jul 06, 2025
You're away from home, you need a file that lives on your desktop PC, and of course the PC is off. Your options: call someone at home and talk them through finding the power button, or give up. This project adds a third one: send a message on Telegram, and the PC turns itself on.
# Waking a PC with a network packet
Most PCs support Wake On LAN (WoL): even when the computer is off, the network card keeps a tiny bit of power and listens to the network. It's waiting for one very specific message, the magic packet, and when it sees it, it turns the computer on.
The packet itself is surprisingly simple: six bytes of FF, followed by the MAC address of the card you want to wake,
repeated 16 times, 102 bytes in total. That's it, no password, no handshake.
Why repeat the MAC so many times? Because the card is half asleep: it doesn't really understand network protocols at that point,
it just scans incoming data looking for this pattern. A row of FFs followed by the same 6 bytes sixteen times in a row
is practically impossible to get by accident, so there's no confusion about who's being woken up.
# The catch: it only works from inside your network
The magic packet is sent as a broadcast, a message to every device on the local network. Routers don't let broadcasts out to the internet (or in from it), so you can't send one from your phone on mobile data. And the PC can't help either: it's off!
So you need a tiny helper that's always on and sits inside your home network. A Raspberry Pi is perfect for the job, and a Telegram bot running on it is the remote control. The whole chain looks like this:
1. You pick a device in the Telegram chat, from wherever you are.
2. The bot on the Raspberry Pi receives the request.
3. The Pi sends the magic packet to the local network.
4. The PC's network card recognizes it, and the PC turns on.
One nice detail: you don't need to open any port on your router. The bot uses polling, which means the Pi is the one that keeps asking Telegram "any new messages for me?". All connections go out of your home, so nothing on the internet can reach the Pi directly.
# What I tried before
This wasn't my first attempt. Here's what didn't quite work, and why:
My brother had the exact same problem, and his feedback helped shape the bot into something anyone can use.
# What you'll need
A Raspberry Pi (or any small Linux machine that's always on). I tested it on a Raspberry Pi Zero 1.3W, and it now runs on a Raspberry Pi 4B, which also hosts my RustDesk server.
Python 3.9 or newer.
Wake On LAN enabled on the PC you want to wake, both in the BIOS/UEFI and in the operating system's network card settings.
A Telegram bot and its token. If you don't have one yet, Telegram explains how to create a bot in a couple of minutes.
# Setting it up
1. Clone the repository:
git clone https://github.com/carlosbravo1408/WakeOnLan.git
cd WakeOnLan
2. Create a virtual environment and install the dependencies:
python3 -m venv .venv
source .venv/bin/activate
pip install -r requirements.txt
3. Create a .env file with your settings:
TELEGRAM_TOKEN=1234567890:AnyTeleBotToken
HAS_OTP_VALIDATION=false           # Optional
ISSUER_HANDLER=AlienNerdDev # OptionalTELEGRAM_TOKEN: the token Telegram gave you when you created the bot.
HAS_OTP_VALIDATION: set it to true if you want an extra lock. The bot will then ask for a
one-time code from an authenticator app every time someone tries to wake a PC (more on that below).
ISSUER_HANDLER: the name that shows up in the authenticator app next to the code.
4. Register who can use the bot and which PCs they can wake. The example script
generate_user.py
shows how to add users (by their Telegram ID), their devices and the MAC addresses of each one.
5. Start the bot:
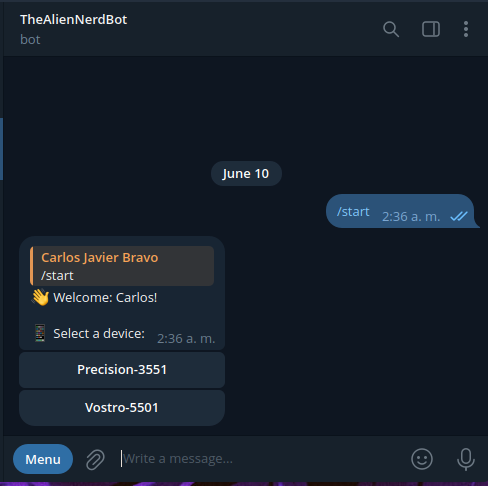
python main.py6. Open Telegram, find your bot and send /start. It replies with the list of devices linked to your account;
tap one and it wakes up. Behind the scenes, the bot sends the magic packet twice for each MAC address, to ports 7 and 9,
because packets on a network can occasionally get lost and it costs nothing to insist.
# Optional: one-time codes (OTP)
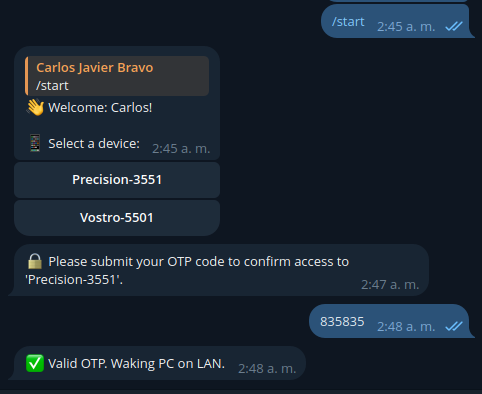
Anyone who gets hold of your Telegram account could turn on your PC. If that worries you, enable OTP validation. The first time you use the bot, it sends you a secret and a QR code: scan it with an authenticator app such as Authy or Google Authenticator.

From then on, every time you ask to wake a PC, the bot asks for the current code from the app. And to avoid leaving sensitive things lying around in the chat, those messages delete themselves after a minute.
# Starting the bot automatically
You don't want to log into the Pi and run the bot by hand after every power cut. Instead of a cron job, the clean way on Raspberry Pi OS is a systemd service: it starts the bot on boot and restarts it if it ever crashes.
1. Create a small launcher, main.sh, that activates the virtual environment and runs the bot
(replace /path/to/WakeOnLan/ with your actual path):
#!/bin/bash
cd /path/to/WakeOnLan/
source .venv/bin/activate
python main.py
2. Create the service file, WakeOnLan.service, again with your own path:
[Unit]
Description=Wake On Lan Service
DefaultDependencies=no
After=local-fs.target
Requires=local-fs.target

[Service]
Type=simple
Restart=always
RestartSec=10
ExecStart=/bin/bash /path/to/WakeOnLan/main.sh

[Install]
WantedBy=multi-user.target
The key lines are Restart=always and RestartSec=10: if the bot stops for any reason,
systemd brings it back ten seconds later.
3. Copy it to /etc/systemd/system, then enable and start it:
sudo cp /path/to/WakeOnLan/WakeOnLan.service /etc/systemd/system

sudo systemctl daemon-reload
sudo systemctl enable WakeOnLan.service
sudo systemctl start WakeOnLan.service
Done: from now on, the bot starts by itself every time the Pi boots.
# And once the PC is on?
Turning it on is only half the job; next you'll want to use it. These are the tools I've tried for that:
RustDesk: my favorite. It's open source and you can host your own server; mine runs on the same Raspberry Pi 4.
Tailscale: what I use to reach my home network from outside. Any VPN works, though; pick whatever you're comfortable with.
TeamViewer / AnyDesk: I used them for a while, but their usage limits and closed source pushed me away. TeamViewer also didn't always get along with Ubuntu 20.04, my main system for work (ironically, I only use Windows for gaming).
# Wrapping up
The core idea here is a classic in networking: when you can't reach something directly, put a small, always-on helper next to it and talk to the helper instead. A 102-byte packet, a Raspberry Pi and a chat bot, and your PC is one message away, wherever you are.